How to Apply Stucco to Concrete Block
(Level: Intermediate)
 Constructing foundations and walls with concrete block is an easier and usually less expensive alternative than poured concrete or stone construction, but the result is not very attractive. Stucco, a custom-mixed or factory-prepared cement plaster, provides an inexpensive, durable, attractive, and low-maintenance finish on interior or exterior foundation and garden walls in any climate.
Generally you can use a time-tested Portland cement plaster (1 part Portland cement, 1 part lime, and 4 parts fine sand) for a base coat. While lime is not necessary, it extends the working time of the stucco - a plus for the inexperienced worker. For more uniform batch-to-batch consistency and color, it's safer to choose a factory-prepared stucco for the second, finish coat.
Apply stucco in mild (50- to 70-deg. F.) weather. Application can be as simple or complex as your skills and experience allow; and the textures that you can achieve are limited only by your imagination. The basic steps are outlined below. Local conditions, sand qualities, and specifics of your project may call for special mixes or additives. White cement and white sand, for example, may be the best choices for white or light-colored stucco. Bonding additives may be required for certain nonabsorptive surfaces. Your masonry dealer is best equipped to advise you about the right mix to use for your particular application. For additional information we suggest that you obtain a copy of the Portland Cement Plaster (Stucco) Manual, published by the Portland Cement Association, and that you refer to the finish-coat manufacturer's installation instructions.
Tools and Materials you need:
- Mortar mixer (rental item shown)
- Power washer (rental item)
- Hoe
- Wood lath and masonry nails
- Shovel
- Hammer
- Hawk (board with handle for loading cement)
- Work gloves
- Garden hose and nozzle
- Goggles
- Common mason's trowel
- Type I Portland cement
- Pointed mason's trowel
- Lime
- Long metal or wood straightedge
- Clean fine sand
- Wood float (wood block with handle)
- Sponge float
- Wheelbarrow
- Nail puller
Step 1: Inspect and Prepare the Surface
The block wall must be sound and true, and significant holes or cracks should be repaired. The surface must also be free of dirt, mold, efflorescence, paint, or other surface contaminants that might interfere with bonding. Typically, power-washing is all that is required for older untreated walls, although in some cases sandblasting is necessary.
Step 2: Install Screed
Attach temporary strips of 3/8-in thick wood lath horizontally to the top and bottom (and, on a tall wall, the middle) of the wall, using masonry nails. These screeds will guide the straightedge (called a rod) that is used to level the surface in Step 7.
Step 3: Obtain Materials
One cubic foot of stucco will cover about 17 square feet of wall for the base coat. Expected coverage for factory-prepared finish stucco is stated on the label. You need about 1 cubic foot of damp sand and 1/4 to 1/3 bag of cement and the same amount of lime to make a cubic foot of plaster.
Step 4: Dampen the Wall
Stucco is best applied over a damp wall, so mist (not soak) the surface with a garden hose and nozzle just prior to application.
 Caution: Cement and lime are caustic. Before you begin mixing, protect your hands with heavy work gloves and your eyes with goggles.
Step 5: Mix the Base-coat Plaster
For large jobs you'll want to rent a power mortar mixer. First add about 2/3 of the water and start the mixer. In succession add about half the sand, the cement, the lime, and the balance of the sand. Mix for a few minutes, adding the remaining water as needed to achieve a uniform batch. If you mix with a hoe in a wheelbarrow, mix the dry ingredients first and mix in half the water immediately and then add the rest as needed. Although dry ingredients can be measured out in buckets, generally you just count shovelsful as you load the mixer or wheelbarrow.
 Tip: Weigh shovelsful of lime and cement separately so you can calculate approximate water needs for your mix. Water, which weighs about 7.8 pounds per gallon, should equal approximately half the weight of the cementitious material (cement and lime) in the mix. Experiment with a couple small batches first to determine the amount of water required. The mix should have the consistency of pudding or soft butter. You can retemper the mix (add water when the mix has become too stiff) up to 30 minutes after the initial mixing.
 Step 6: Apply the Base Coat
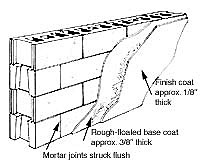
Load some stucco on a hawk and then onto your trowel. Initially hold the loaded trowel at a 45-degree angle against the wall, and reduce it slowly to 30 degrees as you apply the stucco with a sweeping motion. Apply sufficient pressure to force the stucco into the rough wall surface. On vertical surfaces you'll probably find it easiest to work from the bottom up. The base coat should be about 3/8-in. thick over the entire area. Avoid excessive troweling, which can cause bonding problems.Load some stucco on a hawk and then onto your trowel. Initially hold the loaded trowel at a 45-degree angle against the wall, and reduce it slowly to 30 degrees as you apply the stucco with a sweeping motion. Apply sufficient pressure to force the stucco into the rough wall surface. On vertical surfaces you'll probably find it easiest to work from the bottom up. The base coat should be about 3/8-in. thick over the entire area. Avoid excessive troweling, which can cause bonding problems.
 Step 7: Level the Plane
After just a few minutes use a straightedge (metal or wood) to level the surface to a uniform 3/8-in. thickness. Place the ends of the straightedge on wood or metal screeds (see step 2) and, using an up and down motion, slowly draw the straightedge across the wall to remove excess material. Fill any depressions and repeat leveling.
Step 8: Remove Screeds
Remove the wood screeds with a nail puller and hammer, disturbing the stucco as little as possible.
 Step 9: Float the Surface
After the surface sheen has disappeared but before the stucco has hardened too much to be worked, go over the entire surface with a wooden or foam mason's float in a swirling motion. This consolidates the stucco and reduces the amount of shrinkage and cracking that occurs as the base coat cures.
Step 10: Mix and Apply Finish Coat
Mix and apply the finish coat the next day. This coat is typically only 1/8 to 1/4 inch thick so screeds are not needed. The procedure is otherwise similar to the above. There are differences from product to product, however, so follow the manufacturer's instructions.
Step 11: Texture the Surface
Dozens of textures are possible. Among the simplest is a somewhat rough but uniform surface achieved by tooling the finish coat with a sponge float or brush. In some cases an additional texture coat of finish material is applied over the initial finish coat and tooled with a trowel or other tool.